CLICK HERE FOR FREE BLOGGER TEMPLATES, LINK BUTTONS AND MORE! »
Showing posts with label organization. Show all posts

Tuesday, August 14, 2012

Classroom Tour!

I now have two days in third grade under my belt! On the first day before the students arrived I snapped some pictures of the room while it was nice and tidy. Check out the before and many after photos!

photo (12)

Here is my classroom before I started unpacking. I ended up getting rid of the teacher desk you see, and having only a table for both my “desk” and guided reading.

photo (56)

And here is the after!

photo (45) photo (50)photo (54) photo (58)photo (53)photo (49)

           Class library and “meeting place”                             My area/guided reading table

photo (46)photo (47)photo (48)

           Student  Mailboxes                             Class Job Chart                         Center Area

photo (52)photo (51)photo (62)

          Math Wall                                 Clip Chart and Lunch Check in        Hallway Bulletin Board

There she is! My new room! I hope my kiddos are starting to feel at home. They think I am totally obsessed with dogs. LOL!

Thursday, July 26, 2012

Classroom Library Series #3 (AND LAST!)

I can officially check another project off the list! And this one turned out even better than I expected. Mostly because everything was free, but I also love how it looks in the room. In my last post I gave a step-by-step of how I transformed an old box into a book tub. The only steps left were creating book labels and attaching the book tubs to the book shelves.

photo (26)

The best part of it all was getting to use a power tool!! The book shelves are not very deep. They were from Blockbuster and made to hold dvds. Chapter books fit perfectly. But I REALLY want to use them for my picture books. So I decided to screw the boxes onto the shelves. They will still hang off the front a few inches, but they won’t go anywhere. And since I am using cardboard boxes, who cares about the holes? I might not have done this if I had invested money in the project.

photo (27)

So now I have 24 book tubs that are securely stuck to my bookshelf. The kids can still browse through the books, but they cannot take the tub down. I didn’t see this as a problem since all of the shelves are low to the ground.

photo (34)

After getting everything drilled in place, I added the book labels. Book labels were pretty time consuming. I luckily found some on TpT for free, but they didn’t have every label I needed. So I made 10 or so myself. I backed them with blue construction paper, laminated them, and used Velcro to attach them to the book tubs.

photo (37)

I just love how uniform everything looks. So much better than my old mismatched tubs that were falling apart! I hope you have enjoyed my library makeover. I am almost ready to post my new classroom before and after pics!

Sunday, July 1, 2012

Teacher Tool Kit & Mini

After my “Pinspiration” to make a Teacher’s Tool Box, I am happy to say it was the easiest Pinterest project I have ever done. I have decided this year that I am going without a teacher desk-just my guided reading table.  I am moving into a new classroom that is smaller than my old room. I will also have a bigger class size. Less room=more organization! I thought the Teacher Tool Kit would be a perfect solution. I can put all the little stuff in the compartments and keep my table nice and tidy. Click the link to see the amazing blog I originally pinned this idea from.
DSCN2025
And here is my step-by-step process of creating the oh-so-pretty Teacher Tool Kit:
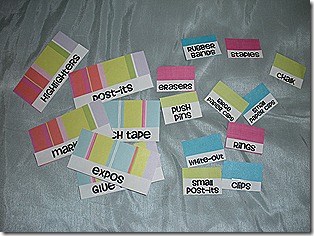
1. Materials: I bought the Stack-On 22-Drawer Storage Cabinet. They sell these at places like Lowes, Home Depot, Menards… I got mine at K-Mart for $16. This was the only thing I had to buy for the project. Everything else I already had (scrapbook paper, tape) or downloaded online (labels). Rebecca at Create Teach Share was so generous to share her labels so I saved myself some time and just printed those. I also downloaded the font she used (Howser) from www.kevinandamanda.com/fonts/freescrapbookfonts/howser/ and made a few labels that I needed. I left a few drawers without a label. After I unpack my boxes I will organize my supplies and see what I need to store the most.


2. Cut labels and scrap paper to fit. It you print the labels from the link, they are on a grid that will be the perfect size. I cut my scrap paper using that grid, then taped the words on the scrap paper. Super easy!
DSCN2020

DSCN2022
3. Using double-sided tape, I taped the labels into the drawers. I wanted to tape them so that I could remove them if I want to change the design, or if I need to replace a label with a different supply name.
So that was all, just 3 easy steps! Since it was so easy and quick, I decided to make a mini version. One thing I was a little bummed about was the depth of the storage cabinet. If you want to store pencils or pens, you have to lay them at an angle. I already bought this three-drawer container from Big Lots for $4.99, and decided it would be perfect. The drawers are deep enough for long pencils/pens. I also found the cute pencil scrapbook paper when I was going through my old stash. Wouldn’t it be a cute teacher gift?
pencil storage
Quick side note… my boxes have finally been moved. to my new classroom. It’s kind of overwhelming to have a room full of boxes to unload, but I am so excited to get my room set up! Enjoy the rest of the weekend…oh wait, we are teachers. Every day’s a weekend! Smile

Saturday, June 23, 2012

Crate Seats

Today was a very productive Saturday. While my husband and father-in-law were working on the deck, I completed my crate seat project. I am thrilled with how they turned out. I was planning to make six, but ended up making 8 because I had extra materials. I just have to head back to Target and get 2 more crates. I can’t wait to get them around my guided reading table and see how they look in my new classroom! And Meatball loves them, too!

photo (1)

Here is a step-by-step guide of how I made them:

1. Get your materials together. I bought my crates from Target for $3.49. Amazing deal! I saw the same ones at Kmart today for over $7! The fabric is from JoAnn Fabrics. I do not sew or do anything crafty with fabric so I had no idea what I was doing. I bought WAY too much fabric. I bought 6 yards, and I ended up getting 4 crates from one yard. (Any easy fabric projects out there?) Also, I wanted dog-themed for my classroom so I had to pay $5.99 a yard. I would suggest going to the clearance bin! The batting luckily was 40% off ($5.99 a yard). I bought 3 yards and that was perfect for 8 crates. The plywood was very easy to get. I went to Lowes and they cut it perfectly for FREE! The total price was $18.83 and we have some leftover pieces. If you have a store cut the plywood for you make sure you take the crate along. That way they can make sure it fits before you buy it. You will also need a staple gun. I borrowed mine from my father-in-law.

photo (7)

2. Cut the fabric and batting. I used a 1/2 yard square of fabric. It was just enough. The batting I cut in long strips the length of the wood, and I folded about four layers to make it nice and cushy.

3. Lay out the fabric upside down. Center the batting and plywood in the middle.

photo (6)

4. Now it is just like wrapping a present. I stapled the longer sides first. Then I stapled the shorter sides like you would the ends of a present. Pull the fabric tight so every side is nice and snug. I used plenty of staples just in case.

photo (4) 

5. Turn it over and TA-DA! Mine were a little tight going into the crate. I don’t know if it was because of the fabric or what… but luckily the plastic crates expand a bit and they fit just fine.

photo

Anyone else making these this summer? What are you going to store inside?